Class Shared Server Space
How to save and upload your completed work to GD:
- in Illustrator, File > Export as a png file
- prompted to log into Gmail
- create a folder with your full name as the folder name
- upload your saved as work file with the name:
A0#_firstname_lastname.png
Week One
Learn the Mac in under an Hour
(optional) What is Photoshop Lightroom?
Friday Assignments:
- Log with any Gmail account into the Class Shared Server Space above, create a folder with your full name inside the space;
- Watch the video:
Week Two & Three
Illustrator Interface
- new file/open file, preferences > units and measurements
- panels, options, tools panel
- color tabs
- shape tools
- selection tool (black arrow) and direct selection tool (white arrow)
- cut, paste, copy, zoom in/out, move tools
- artboards
- save, save as
- Continue with Direct selection tool
- Transform tools
- Warp tool, Twirl Tool ((http://www.bittbox.com/illustrator/fun-with-illustrators-lesser-known-yet-powerful-tools))
- type tools: Window > Type
- Color (workspace > painting)
- Layers Panel
Assignment 01: tutorial link
The final work should look like this:

Save your work as A01_firstname_lastname.ai for your record, then save as a png file and upload it to GD.
Week Four:
- Review tools
- Gradient tool, Swatches to make patterns
- Type Tools and Character Panel
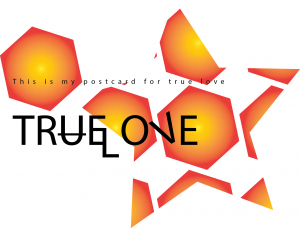
Assignment: create a postcard with elements that you create from scratch, together with efficient typographic control. Save the file as A02_firstname_lastname.ai, and then Export As a pgn file before uploading it to your google drive folder.
example:
Extra credit exercise. watch this video, and create an artwork with the width, warp, twirl, pucker, bloat, scallop, crystallize, and wrinkle tools. Name this file EC_Firstname_Lastname.ai
Week Five:
- Paragraph panel
- Pathfinder
Friday Assignment 03:
- In Illustrator, create a new file, 8×10 in, CMYK, 300dpi
- Save the file as A03_firstname_lastname.ai
- Adjust your workspace if necessary
- Use the Type tool, type in the word “demonstration”, go to Window > Type > Character to activate the Character panel. Highlight the word again, and choose Arial, 18 point for the letterforms.
- Open the Layer panel by going to Window > Layer. Create a new layer.
- Now go to the previous layer, make a copy of the word demonstration, and paste it into the new layer
- Repeat the previous two steps until you have 3 layers of the word demonstration
- Adjust the font sizes, colors, and kerning and tracking of each layer, so the words look differently.
- Now toggle the visibility icon of two demonstration layers in front to so only one word is visible now.
- Save your work by pressing Command+S.
- Now create a new layer, name it logo. Draw a large circle by pressing Option+Shift while dragging. Fill it with the color of your choice.
- Copy and paste this shape and make it smaller. Place the new circle above the big one, and fill in a different color so you can tell which one is above the other.
- Create a triangle (Star tool, click the canvas to change the point number to 3) to sit above the small circle, and fill it with a different color.
- Save your work by pressing Command+S.
- Shift+Select the small circle and the triangle. Then open the Pathfinder panel by going to Window > Patherfinder. While both shapes are selected, apply Divide under Pathfinders.
- Now use the Direct Selection Tool (white arrow). Select the small new sections that you just created. Apply different colors to these areas.
- Use the Type tool, type in TJ in a bold typeface and place it above the triangle.
- Move your word Demonstration to be just beneath the logo.
- Save your work. Upload the file to GD.
Week Six
A04_firstname_lastname.ai
- In Illustrator, create a new file, 8×8 in, CMYK, 300dpi
- Save the file as A04_firstname_lastname.ai
- Adjust your workspace (Window>Workspace) to Essentials if necessary.
- Change your Fill color to None, and Stroke color to a color of your choice.
- Now click the shape tool within the Tools panel, choose Polygon Tool, click once on your artboard, so you can see the Polygon dialogue window, make Radius to be 1 inch, and type 5 for Sides. You should see your first polygon.
- While the polygon is still being selected (if not, use the Selection Tool/black arrow to select it), go to the Tools panel, find Rotate Tool, double click it to bring out the Rotate dialogue window, put in 25 degree, make sure Preview is checked on, then click COPY. You will see the second polygon being created.
- Use the keyboard shortcut Command+D to repeat the last action for 20 times.
- Save your file by keyboard Command+S shortcut.
- Draw a circle in the middle within your shapes. Fill it with a color.
- While the circle is still being selected (if not, use the Selection Tool/black arrow to select it),find Reshape Tool from the Tools Panel, click four times on the path of the circle to add four extra anchor points.
- Now switch to Direct Selection Tool (white arrow), click on one of the newly added anchor points to activate it, then drag and pull it outward or inward to create abstract shape out of the circle. Do the same thing for the other three points.
- Now select the abstract shape again, apply gradient with at least two colors to it with the Gradient panel setting (Window>Gradient).
- Save your file.
Week Seven – Nine:
Pen tools
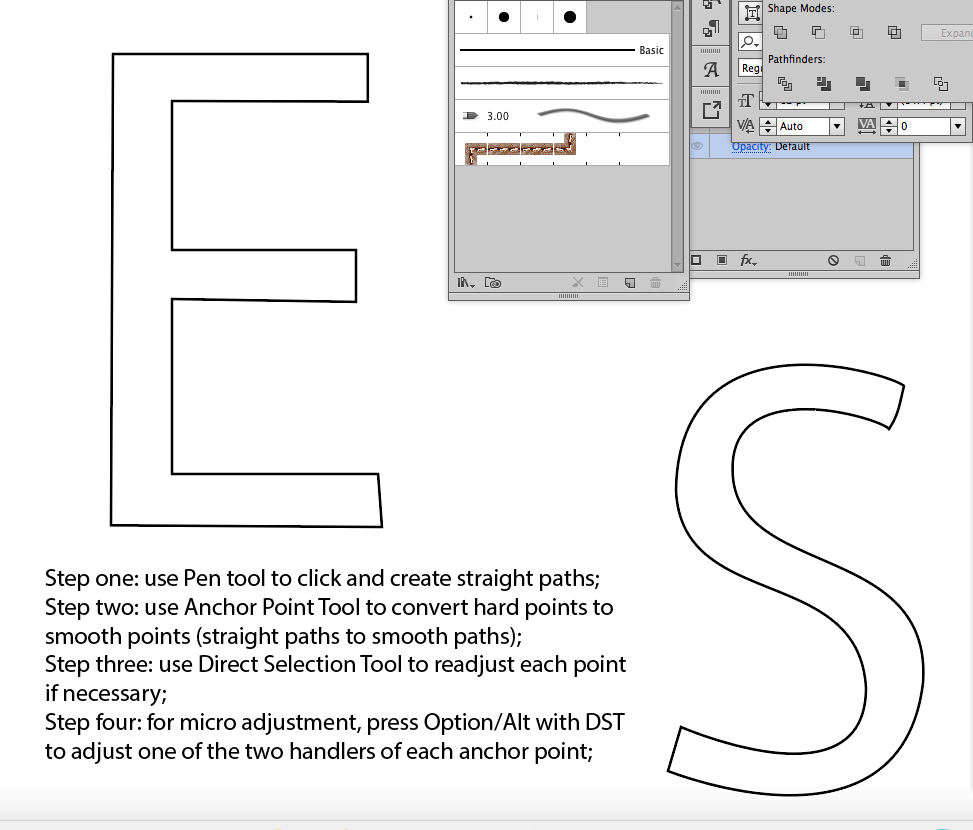
Step one: use pen tool to click and create straight paths
Step two: use Anchor Point Tool to convert hard points to smooth points (straight lines to curvilenear lines)
Step three: use Direct Selection Tool to readjust each point if necessary
Step four: for micro adjustment, press Option/Alt with DST to adjust one side of the handlers of each anchor point
In-class Exercise: trace letter E and S with the methods above.
Trace and draw a cartoon character, save it as A05_firstname_lastname.ai and upload to GD.

Optional – for self study
Introduction to Illustrator Pen Tools (watch prior to proceeding if you miss our first session on Pen Tools)
Illustrator Pen Tools tutorial here.
We will have the midterm test on Illustrator on the Wednesday of Midterm Week.
Midterm Test on Illustrator: link
Week Eleven:
Introduction to Photoshop: Workspace, Preferences, History, Layers, New File, Tools
Selections in Photoshop: link one, link two
Create a new document, 8.5×11 in, 300 ppi. Copy and paste your selections from their original files into this new document.
Your file should be saved as A07_firstname_lastname.psd. Please upload it to GD.
Week Twelve:
Review our content by watching the videos on PS magic wand tool and magnetic lasso tool, and make your selections from images below using appropriate tools, then copy and paste the selected area into a new document (5x7inch, 300dpi) to form a collage.
Image One (use magic wand tool and/or quick selection tool)
Image Two (use magnetic lasso tool)
Add a background image as the bottom layer.
the file should be saved as A08_firstname_lastname.psd. Please upload it to GD.
Week Thirteen: (to be skipped)
Select & Mask
Weekly Assignment: separate the model from this image from its background. Locate a different background image to be used as the new background. Save the file as A09_firstname_lastname.psd and upload it to GD.
Week Fourteen
Layer Mask
Assignment:
Pick your own images to compose a design with layer mask effects, as the examples above show.
Save as A10_firstname_lastname.psd and upload it to GD.
Clipping Masks
Assignment:
Save as A11_firstname_lastname.psd and upload it to GD.
Week Fifteen
Exercise of Color Patches: select within the following image a few different areas, use your pen tools to make selection, and apply different colors to each selection. Save your work as A12_firstname_lastname.psd and upload it to GD.
Advanced Assignment: Turn this original image to this final one by adding a swimming pool with layer mask and Brush tool. Advanced level: change the grass to green and sky to blue (optional)
Weekly Assignment: A12A_firstname_lastname.psd and upload it to GD.
Week Sixteen & After
Review
Last Day of Class & Test Date: Wednesday, November 20th.
All projects due on Google Drive date: Monday, December 2nd, 11:59
Photoshop Test: link
210 comments for “CART277 Computer Imaging Basics”